1. Via JSON
POST /v2/oauth2/token HTTP/1.1
Host: localhost:8080
Content-Type: application/json
Accept: application/json

{
    "grant_type":"password",
    "username":"admin",
    "password":""
}
For the purposes of this tutorial, we will be using the Postman REST Client in the screenshots. However, you are free to use any other REST client you prefer. Since we're using a local version of garlic-player, the domain will be localhost here.
Every API command will require a valid token for authentication. You must first request a valid token to use the API. Two kinds of POST request are capable of doing this.
POST /v2/oauth2/token HTTP/1.1
Host: localhost:8080
Content-Type: application/json
Accept: application/json
{
"grant_type":"password",
"username":"admin",
"password":""
}
POST http://localhost:8080/v2/oauth2/token
Content-Type: application/x-www-form-urlencoded;charset=UTF-8
Accept: application/json

grant_type=password&username=admin&password=
If everything goes as expected, you should receive a response of the form:
{
    "access_token": "9EED50FE365F112A4D6BEA7B5ED8BFAD",
    "expires_in": "2022-09-24T00:08:12",
    "token_type": "Bearer"
}
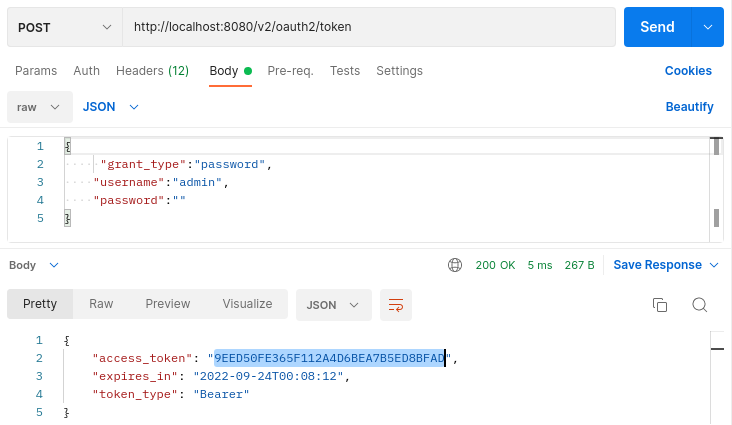
You may also want to look at the reference for theauthentication iinput and output parameters. We'll need the marked token for the next step.
If the domain is unknown, you will receive a "404 Not found" response with the error message: The URL is wrong, no such document.
A successful request will return a response with code 200. If a parameter is incorrect, you will receive a JSON response with an 'error' key containing a descriptive message, such as 'wrong grant_type' or 'wrong username', etc.
In the next step, we will use the token to accomplish certain tasks.
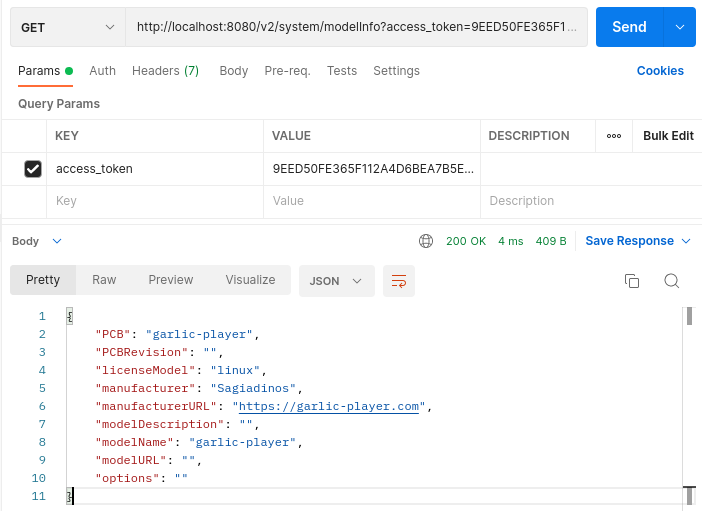
This expects only a GET request without additional parameters.
GET /v2/system/modelInfo?access_token=9EED50FE365F112A4D6BEA7B5ED8BFAD
Host: localhost:8080
Accept: application/json
On my Arch Linux machine, I will get This response:
{
  "PCB": "garlic-player",
  "PCBRevision": "",
  "licenseModel": "linux",
  "manufacturer": "Sagiadinos",
  "manufacturerURL": "https://garlic-player.com",
  "modelDescription": "",
  "modelName": "garlic-player",
  "modelURL": "",
  "options": ""
}
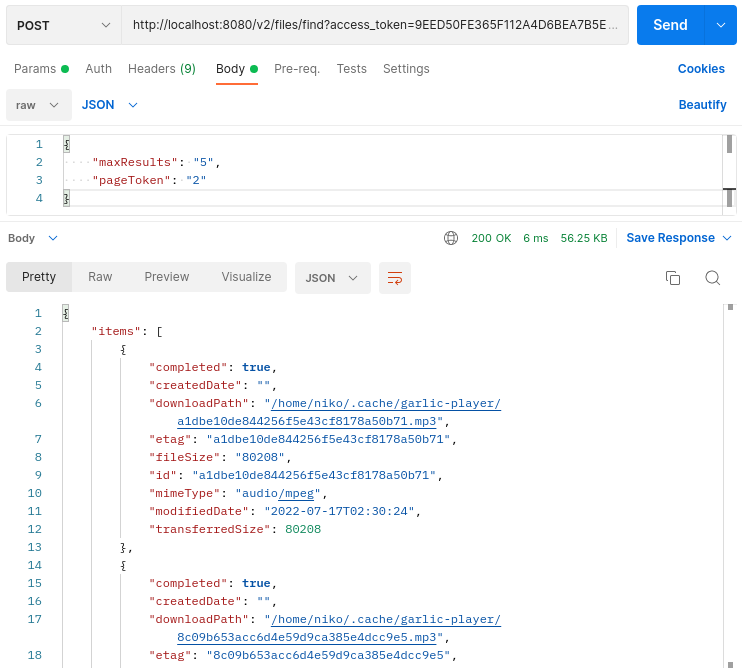
Let's try something more challenging and list the files in the cache. Once again, we use the JSON approach.
POST /v2/files/find?access_token=9EED50FE365F112A4D6BEA7B5ED8BFAD HTTP/1.1
Host: localhost:8080
Content-Type: application/json
Accept: application/json

{
  "maxResults": "5",
  "pageToken": "2"
}
The results will be provided in pages. The maxResults parameter specifies how many items will be shown, and pageToken identifies which page. These are not mandatory. The maxResults parameter has a default value of 10, and pageToken has a default value of 1. The result is a list of items in JSON format, which looks like this.
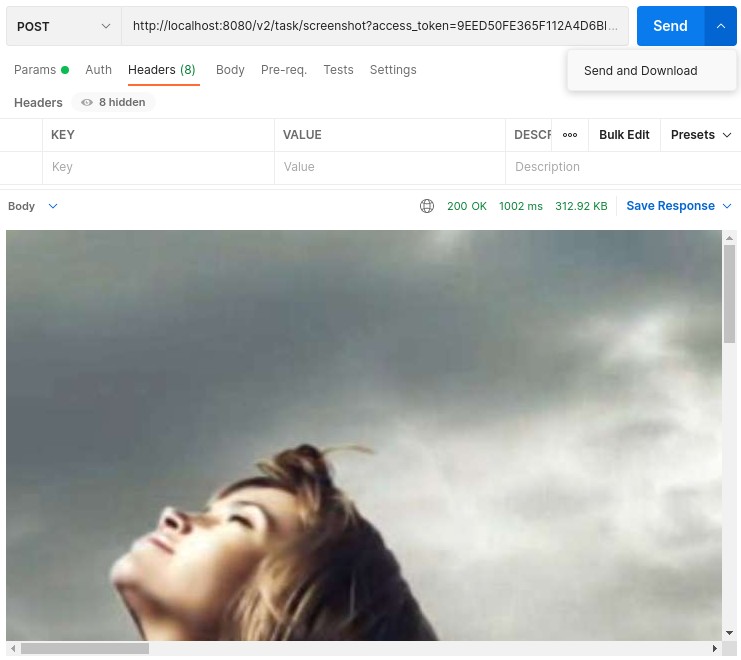
The REST-API also lets you take a screenshot. If you are using a desktop operating system with multiple screens, it will screenshot the primary screen. The screenshot API entry point is:
POST /v2/task/screenshot?access_token=9EED50FE365F112A4D6BEA7B5ED8BFAD HTTP/1.1
Host: localhost:8080
Content-Type: application/json
Accept: application/json
A successful response sends you the Content-Type: image/jpeg, the Content-Length and the image.